
Cart items:
Germination Methods Compared: 5 Ways to Sprout Cannabis Seeds
Nov 21, 2026
Every grow starts the same way: a dry seed, a little water, and a few days of waiting. Germination is the stage where beginners worry the most and where the least can actually go wrong, as long as you give the seed what it needs and then leave it alone.
The trouble is that every grower seems to swear by a different method. One says paper towels, another says straight into soil, a third will not use anything but starter plugs under a dome. They are all right, because all of these methods work. They differ in how much you can see, how much you have to handle the seedling, and how easy they are to get wrong.
This guide compares the five most common ways to germinate cannabis seeds, explains who each one suits, and ends with a simple recommendation if this is your first grow. One note before we start: Cannavista sells grow equipment, not seeds. Buy seeds only where it is legal for you to do so, and check your local rules on home growing.
What a seed needs to sprout
A seed is a dormant plant with a packed lunch. It already contains the first root, the first pair of leaves and enough stored energy to push both out. It does not need light, and it does not need nutrients. It needs four things:
- Moisture. Water soaking through the shell is the signal to wake up. The seed has to stay evenly damp from that moment on. If it dries out after it has started, it dies.
- Warmth. Aim for 75 to 80°F (24 to 27°C). Seeds will sprout in cooler rooms, but slowly, and slow seeds are more likely to rot.
- Air. A seed breathes. Damp is good; soaking wet is not. A seed sitting in standing water for days will drown.
- Darkness and peace. Roots grow away from light. Once the seed is set up, the best thing you can do is stop checking it every hour.
Every method below is just a different way of delivering those four things. When a method fails, it is almost always because one of them was missing: the paper towel dried out, the room was too cold, or the medium was waterlogged.
The five methods at a glance
| Method | Difficulty | Typical time to sprout | Handling the seedling | Best for |
|---|---|---|---|---|
| Paper towel | Easy, but needs attention | 1 to 4 days | Yes, one delicate move | Growers who want to see the seed crack |
| Water soak | Very easy | 12 to 36 hours to crack | Yes, then moved to a medium | Older or hard-shelled seeds, as a first step |
| Direct in soil or coco | Easy | 3 to 7 days to break the surface | None | Growers who want the least handling |
| Starter plugs with a dome | Easy | 2 to 5 days | None; the plug is transplanted whole | Beginners, and anyone starting several seeds |
| Rockwool cubes | Moderate | 2 to 5 days | None; the cube is transplanted whole | Hydroponic grows |
The times are typical, not promises. Fresh seeds in a warm room are quick. Older seeds or a cool room can take a week or more. Give a seed at least ten days before you give up on it.
Method 1: The paper towel
This is the method most people learn first, because you can watch it work.
How to do it. Wet two sheets of plain paper towel and wring them out so they are damp, not dripping. Lay one on a plate, place the seeds on it about an inch apart, and cover them with the second sheet. Turn another plate upside down on top to hold in the moisture and keep out the light. Put the plates somewhere warm and check once or twice a day. If the towel is starting to dry, add a few drops of water.
In one to four days the shell splits and a white root, called the taproot, appears. When it is a quarter to half an inch long, the seed is ready to plant. Make a hole about a quarter inch deep in your growing medium, set the seed in with the root pointing down, cover it lightly and water gently.
What is good about it. You know exactly which seeds are alive before you use up pots and soil on them. It costs nothing and uses things you already have.
What goes wrong. Three things, mostly. The towel dries out overnight and the seed dies. The towel is too wet and the seed rots. Or the grower waits too long, the root grows into the paper fibers, and it tears when the seed is lifted. The taproot is the most fragile part of the plant's whole life. Never touch it with your fingers; move the seed by its shell, with clean tweezers if you have them.
Method 2: The water soak
Soaking is less a full method than a head start. It is the simplest way to get water through a tough shell.
How to do it. Fill a glass with room-temperature water and drop the seeds in. They float at first. After a few hours, tap them gently and most will sink. Leave the glass in a warm, dark place for 12 to 24 hours. Some seeds will show a small white tip in that time. Then move every seed, sprouted or not, into a paper towel, a starter plug or your growing medium to finish.
What is good about it. It is hard to get wrong on day one, and it helps older seeds that have dried out in storage.
What goes wrong. Leaving seeds in the glass too long. Past about 32 hours a seed that has not found air will start to drown. Set a reminder. And because the seed still has to be moved afterward, you take on the same handling risk as the paper towel method.
Method 3: Straight into soil or coco
This is how seeds sprout in nature, and it is the method with the least to do.
How to do it. Fill a small pot with a light seedling mix or coco. Avoid rich, heavily fertilized potting soil at this stage; a seedling does not need the nutrients, and strong soil can burn it. Wet the medium until it is evenly damp, then let it drain. Make a hole a quarter to half an inch deep, drop the seed in, cover it loosely and do not press down. Keep the surface damp with a spray bottle rather than pouring water on it. A clear plastic cover over the pot helps hold moisture until the seedling appears.
What is good about it. The root is never touched and never moved. The seedling grows where it was planted, which avoids transplant shock entirely in the first weeks.
What goes wrong. You cannot see anything. For three to seven days you are watching bare soil, and the temptation to dig the seed up for a look is strong. Do not do it. The other common mistakes are planting too deep, so that the seedling runs out of energy before it reaches the surface, and overwatering a large pot so the medium stays cold and soggy. Start in a small container and pot up later.
Method 4: Starter plugs with a humidity dome
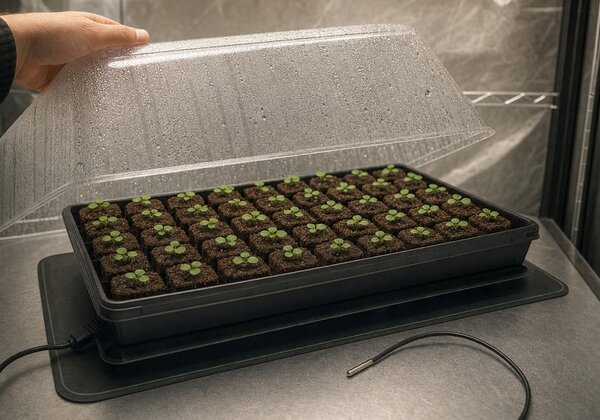
Starter plugs are small pre-formed pieces of growing medium, usually made of peat, coco or composted bark, each with a hole in the top for a seed. They sit in a tray under a clear lid, often on a heat mat. This is how most commercial growers start seeds, and it is also the most forgiving setup for a first-timer.
How to do it. Moisten the plugs if they arrive dry; they should feel like a wrung-out sponge. Place one seed in each hole, about a quarter inch down, and pinch the top of the plug loosely closed. Set the plugs in the tray, put the dome on, and place the tray on a heat mat if your room is cooler than 75°F. Open the vents on the dome a little, or lift it once a day for a minute, to let fresh air in.
Seedlings usually appear in two to five days. Once they are up, give them light right away, and over the next few days open the vents further so they get used to normal room air. When roots start showing through the sides of the plug, plant the whole plug into its pot.
What is good about it. The plug holds the right balance of water and air on its own, which removes the two biggest causes of failure. The dome keeps humidity high, the heat mat keeps the temperature steady, and nothing is ever handled except the plug. If you are starting more than a few seeds, a tray keeps them organized and easy to label.
What goes wrong. Heat mats can overheat a small tray, especially in an already warm tent. If you use one, a thermostat with a probe is worth having, or simply put a towel between the mat and the tray and check the temperature inside the dome. The other mistake is leaving the dome sealed tight for days: stale, wet air invites mold and a problem called damping off, where the stem rots at the soil line.
If you want to set this up, you will find humidity domes and propagation trays and seedling heat mats in our cloning and seed starting section.
Method 5: Rockwool cubes
Rockwool is spun mineral fiber, a bit like dense insulation, pressed into cubes. It holds water and air very well and contains nothing organic, which makes it the standard starting medium for hydroponics.
How to do it. Rockwool is naturally alkaline, so it has to be conditioned first. Soak the cubes for a few hours in water adjusted to a pH of about 5.5, then let them drain. Shake off the excess; do not squeeze them, because that crushes the air spaces. Place one seed in each hole, cover the hole with a pinch of loose rockwool, and treat the cubes like starter plugs: tray, dome, gentle warmth.
What is good about it. It is clean and consistent, and the cube drops straight into a hydroponic system or a larger rockwool block with no transplant shock.
What goes wrong. Skipping the pH soak is the classic beginner error; seedlings in untreated rockwool often stall. Rockwool also holds a lot of water, so it is easy to keep it too wet. And the dry fibers are an irritant, so wear gloves and avoid breathing the dust when handling it. If you are growing in soil, starter plugs do the same job with less preparation.
Which method should you choose?
If this is your first grow, here is the short version.
- You want the most reliable result with the least handling: starter plugs in a tray with a humidity dome. It costs a little more than a paper towel, and it takes most of the guesswork away.
- You want to spend nothing and see what is happening: the paper towel method. Check it twice a day and plant as soon as the root is a quarter inch long.
- You have only a seed or two and a pot ready: plant straight into a light seedling mix and be patient.
- Your seeds are old or have been stored for a long time: soak them for 12 to 24 hours first, then use any of the methods above.
- You are growing hydroponically: rockwool cubes, properly soaked.
Many growers combine two: a short soak to wake the seed, then a starter plug to finish. That is a sound approach and a good one to try once you have done a round or two.
Five mistakes that cause most failures
- Too much water. More seeds are drowned than dried out. Damp, never soaked.
- A cold room. A windowsill in winter or a concrete floor can be 15 degrees cooler than the air at head height. Measure the temperature where the seeds actually are.
- Planting too deep. A quarter to half an inch is enough. Deeper than that and the seedling may never reach the light.
- Touching the taproot. Oils and bacteria from your skin, or a small bend, can kill it. Handle the shell only.
- Checking too often. Every time you unwrap, dig or lift, you change the temperature and moisture. Set it up well, then check once or twice a day.
After the sprout: the first week
Once the seedling breaks the surface, its needs change quickly.
Light. Give it light as soon as you see green. A seedling in the dark stretches into a tall, thin stem that falls over. Seedlings need gentle light, not full power: keep an LED grow light well above them, or dimmed, and follow the maker's guidance for seedling distance.
The seed shell. Sometimes the shell stays stuck on the first leaves, like a helmet. Usually it drops on its own within a day. If it does not, mist it with water to soften it and leave it alone a little longer before you try to ease it off.
Water and food. Keep the medium lightly damp and do not feed. The first round leaves, called cotyledons, carry the seedling's food for the first week or so. Start a very light feeding only after it has grown a couple of sets of true, serrated leaves.
Humidity. Young seedlings like humid air, around 65 to 70 percent, because their roots are still tiny. If you used a dome, open it gradually over several days rather than taking it off all at once.
Common questions
How long does germination take? Most healthy seeds crack within one to four days and are above the surface within a week. Allow up to ten days before you call it.
Do seeds need light to germinate? No. They need darkness, warmth and moisture. Light matters from the moment the seedling appears.
Should I use tap water? In most places tap water is fine. If yours is heavily chlorinated, let it stand in an open container overnight first, or use bottled or filtered water.
Do I need a heat mat? Only if the place where your seeds sit is cooler than about 72°F. In a warm room or tent you can do without one.
My seed cracked but stopped growing. What happened? Usually it dried out for a few hours, got too cold, or sat in too much water. Check those three things before your next attempt; the method itself is rarely the problem.
What works for you?
Ask ten growers how they start seeds and you will get at least four answers, each defended with complete confidence. That is good news for a beginner: it means there is no single right way, only the conditions the seed needs and the method that helps you provide them without fuss.
Pick one, set it up carefully, and resist the urge to interfere. If you already have a favorite method, tell us which one and why on our social channels. We are collecting answers from the Cannavista community and will share how the methods stack up.
Comments
No posts found
Write a review
Meet Cam - Your Cannavista Assistant
Hey there! I’m Cam, your Cannavista guide. Need help finding gear, tracking an order, or starting your own store? Just ask!